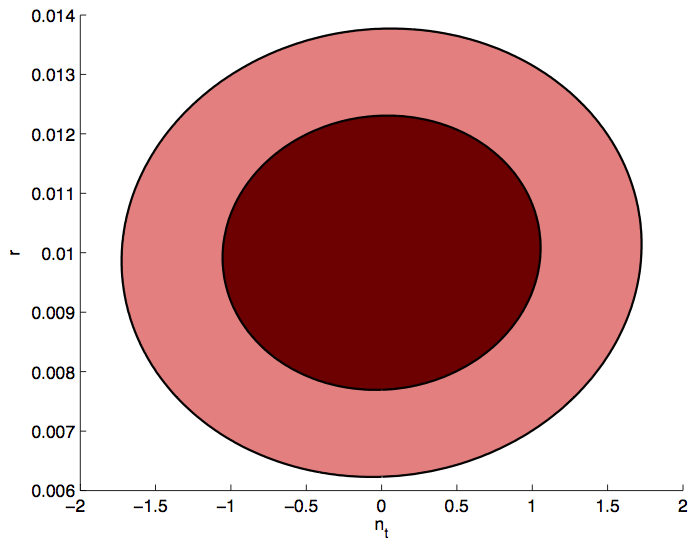
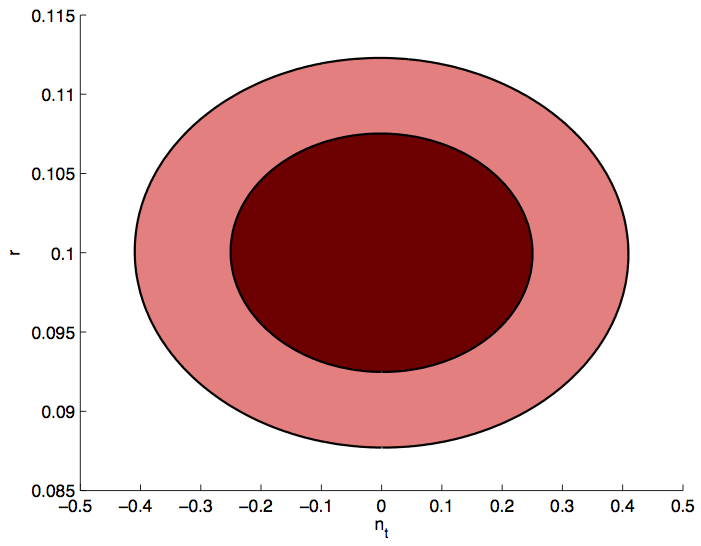
S4 Inflation Chapter Plot Suggestions

 (Victor Buza)
Updated 2016-06-22: Updated Section 3 to include No Delensing, No Foregrounds, and No Decorrelation cases.

This is a simple posting in which I put up for discussion some plots for Chapter 2 of the S4 Science Book. There are two new types of plots: \(r-n_s\) and \(r-n_t\), and two old types of plots: "\(\sigma_r\) vs Effort" and "\(\sigma_r\) vs \(f_{sky}\)," which have been updated to include decorrelation, and to have an extra panel depicting the "fraction rms of the lensing residual" and "the fraction of total effort going towards delensing."


1. \(r-ns\)

For this plot, I assume that the \(n_s\) constraint comes from \(TT, TE, EE\) and the \(r\) constraint comes from \(BB\). Under this assumption, I can take the \(\sigma_{n_s}\) achieved by the large survey, and the \(\sigma_r\) achieved by the small survey, and form a perfectly non-degenerate ellipse. For the large survey, I was guided by this posting, and picked \(n_s=0.9655\) and \(\sigma_{n_s}=0.002\). For the small survey, I was guided by the decorrelation section of this posting, and picked \(r=[0,0.01]\) and the minima \(\sigma_r=[0.00075, 0.00159]\) for \(f_{sky}=[0.01, 0.10]\).

Figure 1:

Current: Represent the current state of the \(r-n_s\) plane. These are the blue contours of Fig7 of BK14 (arxiv:1510.09217); they include Planck TT + lowP + lensing + BAO + JLA + H0 + BK14.

S4+Planck: Represent the projected contours for the combination of constraints from the small-sky and large-sky portions of the S4, and added information from Planck.

Given that there is a large dynamic range between the current state, and the future, I have played around with some plot styles trying to best capture the improvement we get by going to S4, and leave enough room for the addition of various theory models. There are three types of plot: Linear, Linear with a Zoom-In, and Logarithmic.


2. \(r-n_t\)

In this section, I extend our model to include \(n_t\) as a parameter. I run CAMB with the same Cosmology as before (w/ \(n_t=0\)), but now pick the pivot scale -- \(k_t\) to break the \(r-n_t\) degeneracy, and calculate \(\frac{\partial C_l^{BB}}{\partial n_t}\) for the extra dimension in the Fisher Matrix. The two cases I consider are \(r=0.01\) and \(r=0.10\), though the second one is mostly out of curiosity. Both cases are using the \(r=0.01\) optimized distribution, and an \(f_{sky}=0.1\), meaning that the \(r=0.10\) is quite non-optimal.

Some literature I found making \(n_t\) forecasts:

The literature finds smaller \(\sigma_{n_t}\), but they also have different assumptions on what the instrument characteristics are, in some cases vastly so; if I change to a Knox formulation of the BPCM (as described in this posting) based on the instrument characteristics for some of the literature case, I can confirm that I recover similar constraints.

Figure 2:

Case r=0.01: \(k_t=0.0097\), \(\sigma_r=0.0016\), \(\sigma_{n_t}=0.69\);
Note that this recovers the same \(\sigma_r\) as quoted in Table 4 of the previous posting.

Case r=0.10: \(k_t=0.0115\), \(\sigma_r=0.0053\), \(\sigma_{n_t}=0.16\)


3. "\(\sigma_r\) vs Effort" and "\(\sigma_r\) vs \(f_{sky}\)"

Figure 3:

Update proposal to Figures 5 and 6 of Chapter 2 of the S4 Science Book. The top panels have been updated to include decorrelation. The plot also grew a bottom panel that shows the fractional rms of the lensing residual and the fraction of total effort going towards delensing. I'm not a huge fan of showing two different quantities on one y-axis, but this is one way to get all the information in.

There are number of other potential lines we might want on this plot:

For all of these lines, one can use the (same) default optimization, to answer questions of the type: "keeping the survey fixed, how do different assumptions impact our \(\sigma_r\)," or, one can re-optimize for each case to answer questions of the type: "given a fixed effort, what's the best \(\sigma_r\) we can achieve under these different assumptions."

In addition to the above, it's important to keep in mind that there are a number of effects that penalize large \(f_{sky}\) that are not included in this analysis:


4. C_l^BB plots

Figure 2:

r=0.01 case. Bin-by-bin tensor separation.